
Never before have homebrewers had so much selection when choosing a fermenter. From low budget buckets, to expensive stainless steel unitanks, the market is flooded with a wide variety of products. When the FermZilla advertised pressure fermentation and a conical design with a very affordable price, we knew we had to see if it was too good to be true.
The FermZilla is a conical homebrew fermenter that is designed to be used under pressure. This innovative product allows you to ferment, carbonate, and even dispense, directly from the fermenter. We highly recommend the FermZilla for any homebrewer looking to improve the quality of their beer. Limiting oxidation, boosting hoppy flavors, and brewing clearer beer are reasons why we love this fermenter.
The new and improved FermZilla has been tweaked to make it one of the most cost effective conical fermenters to date.
We got our hands on a FermZilla and took it to the test. We’ll guide you through the ins-and-outs of this new fermenter and give our honest opinion on if you should buy one.
What is a FermZilla?
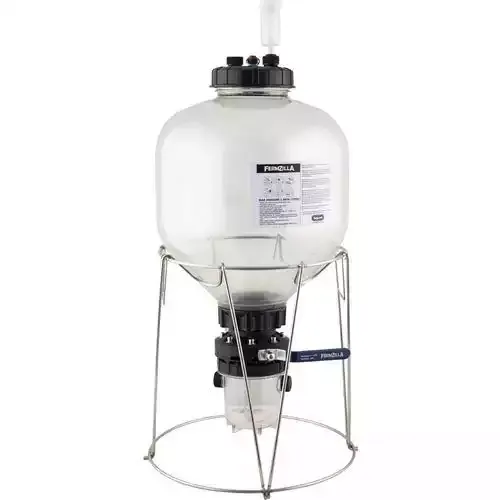
The FermZilla is a conical fermenter designed to be used under pressure – up to 35 PSI. Its plastic construction and unique design make this fermenter very affordable. Never before have homebrewers had a budget-friendly product that mimics professional unitank functionality.
KegLand, the company behind the FermZilla, are innovative Australian homebrew specialists. FermZilla’s predecessor, the Fermentasaurus, opened many homebrewer’s eyes to pressure fermentation. Based on that product’s success, KegLand invested in developing an updated version that fixed many of the original’s shortcomings.
The FermZilla comes in two volumes – 7.1 gallons and 13.2 gallons. The two sizes share all of the same components aside from the plastic tank, allowing it to be upgraded by simply replacing the tank.
With innovative features like a yeast dumping container and floating dip tube, we were excited to get a hold of the product for a hands on review. We tested out the 7.1 gallon version. That’s easily big enough to fill one standard corny keg.
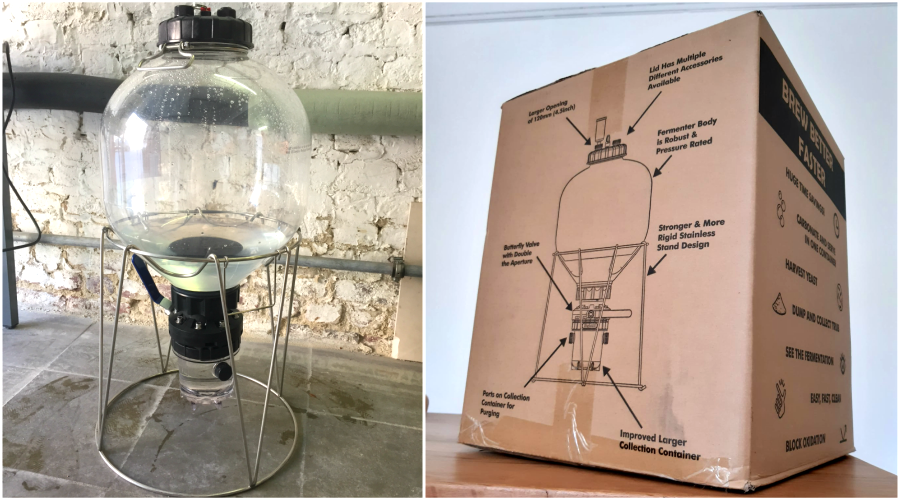
What’s in the box?
Coming in a nicely packaged and branded box, I was surprised at the compact size of the FermZilla. Everything came wrapped or covered with plastic, and all of the components were securely zip tied to the frame. After unpacking, there is some minor assembly. A small slip of paper guides you to download the instructions from their website. The following parts were all there:
- Stainless steel frame
- Conical standard tank
- Collection container and removal tool
- Lid with airlock
- Stainless steel handle
- Butterfly dump valve assembly
- Seals, gaskets, and screw caps
In addition to the FermZilla starter kit, I also got the pressure kit and spunding valve assembly. This is an optional extra that allows for pressure fermentation and closed transfers. The kit includes the silicone dip tube, stainless float assembly, and liquid and gas ball lock posts. The spunding valve assembly comes with a BlowTie valve, pressure gauge, and fittings.
How to set up the FermZilla
I started my brew day and during the 60 minute mash, began assembling the FermZilla.
Out of the box, the FermZilla is very clean. I felt some oily texture on some of the parts, so thought I would give it a light rinse with PBW for my own peace of mind. It’s probably not necessary, but can’t hurt. After that I closely followed the instructions and assembled the FermZilla.
The package comes with some extra o-rings and gaskets. These are spare parts. All of the required o-rings and gaskets were pre-installed on the components. It’s worth double checking just in case.
Assembly is straightforward but I had a few minor hiccups along the way. The cone shaped seal comes in two parts. It must be separated to fit inside the top opening. I was confused and, at first, installed this incorrectly which caused a leak. It’s a tight fit, but both components will fit inside the opening
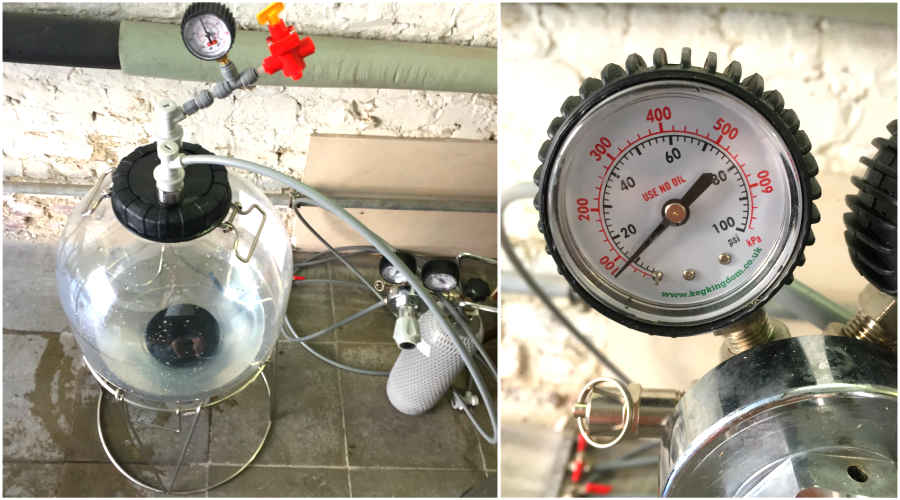
Once I fixed the issue with the cone shaped seal, I filled the fully assembled fermenter with about 5 gallons of water mixed with StarSan. I turned the unit upside-down to check for leaks around the lid. Happy with the results, I proceeded to do a final check for air leaks.
Hooking up my CO2 tank to the gas ball lock post, I turned the gas pressure up to about 10 PSI. I could instantly hear a faint hiss coming from the ball lock posts. After some troubleshooting, I found that I had overtightened the posts. Since the lid’s thread is plastic, overtightening actually deforms the plastic to cause air gaps. I depressurized the tank and loosened both posts. Hand-tight is all that’s required for a seal. I repressurized and was happy to see an air-tight seal.
At this point, I pressure transferred the sanitizer from the FermZilla to a clean corny keg to sanitize and have it ready for the finished beer.
All in all, the set up took about 1 hour, including all the testing and troubleshooting. I was pretty happy with the way everything went and was comfortable to start using it with my freshly brewed wort.
Fermenting with the FermZilla
After the brew day, I was pleasantly surprised by how easy the FermZilla was to set up and fill with wort. I like the larger opening which was easy to pour the wort through. I don’t oxygenate with pure oxygen, so I dumped from the brew kettle’s valve and was happy with the splashing and aerating caused by gravity.
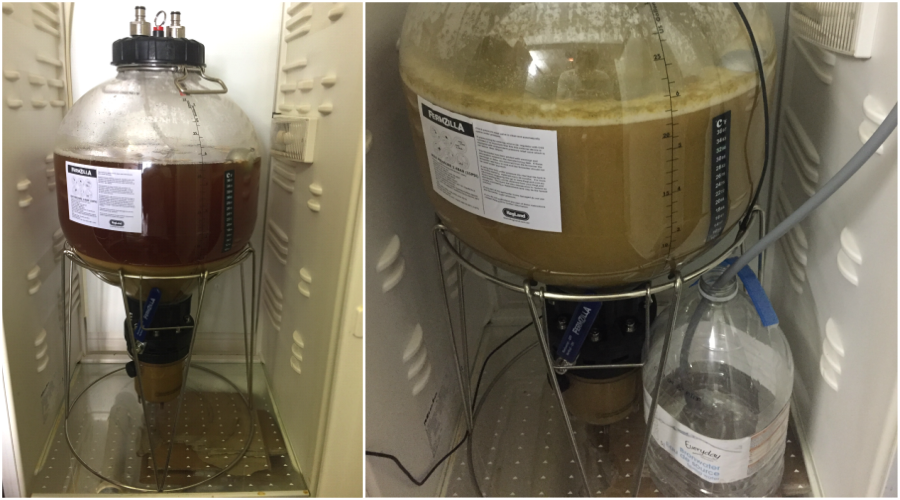
I carefully moved the FermZilla to my fermentation fridge. The instructions warn against moving a full FermZilla. It seemed to work for me, but in the future, I’ll try to fill the fermenter when it’s much closer (or inside) the fridge.
Instead of using the provided airlock, I hooked up a blow-off tube to the gas post. After a day of fermentation, I then replaced the blow-off tube with a spunding valve set at 25 PSI.
Since I used kveik yeast for this beer, I kept the fermentation temperature hot, around 90F. This highlighted a possible downside to the fermenter. At higher temperatures, carbonating requires higher pressure. This can be seen using a carbonation calculator. In order to fully carbonate the beer, the pressure would need to exceed the rated maximum for the FermZilla, which is 35 PSI.
Nevertheless, I finished the fermentation under pressure, about 25 PSI. This helped slow down the fermentation and add some CO2 in solution. Saving on CO2 is a great benefit here. I estimate it took half as much gas to fully carbonate. Plus, transferring fully carbonated beer can be a bit messy with the risk of foaming. For my first transfer, I was happy to not have to worry about that variable.
For typical brewer’s yeasts, it’s not normally a problem to stay below the maximum rated pressure. You could easily ferment under pressure and fully carbonate most beer styles. I look forward to experimenting with this on future batches.
After all signs of fermentation ceased, I lowered the temperature of the fermentation fridge to 40F. When cold crashing a sealed fermenter, make sure there is at least 5 PSI of pressure to prevent a vacuum collapsing the fermenter walls.
Transferring Beer
After cold crashing for 48 hours, I was ready to transfer the beer from the FermZilla to a keg. The beer dropped quite clear but with a slight haze. I figure some extra time in the keg will clear it up. The yeast collection chamber was full of tightly packed yeast, hop matter, and trub, so was certain I would be transferring only clear beer.
Before I started the transfer, I hooked up a picnic tap to the beer-out post on the FermZilla. Much to my annoyance, it wasn’t pulling beer! Upon closer observation, I found that the floating dip tube was not submerged in the wort. The fermentation must have moved the floater ball and, unluckily, it ended up above the liquid.
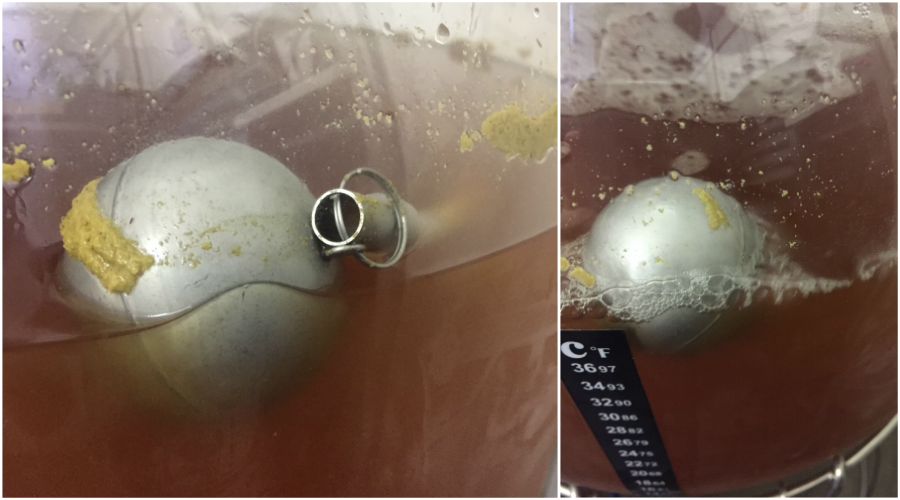
I tried pushing some CO2 through the beer-out post to try to budge the ball but that didn’t do anything. Reluctantly, I shook the FermZilla back and forth until the metal ring dislodged and the dip tube settled below the surface of the beer. I let the fermenter settle for an hour before I went back to keg the beer.
After the beer settled, transferring was a breeze. I hooked up my CO2 tank to the FermZilla gas post and kept the regulator at 5 PSI. Then I connected the beer-out of the FermZilla to the beer out of my sanitized and purged corny keg. On the gas out of the keg, I attached a spunding valve, fully closed. I slowly opened the spunding valve until I heard gas escape and saw beer flowing through the beer line.
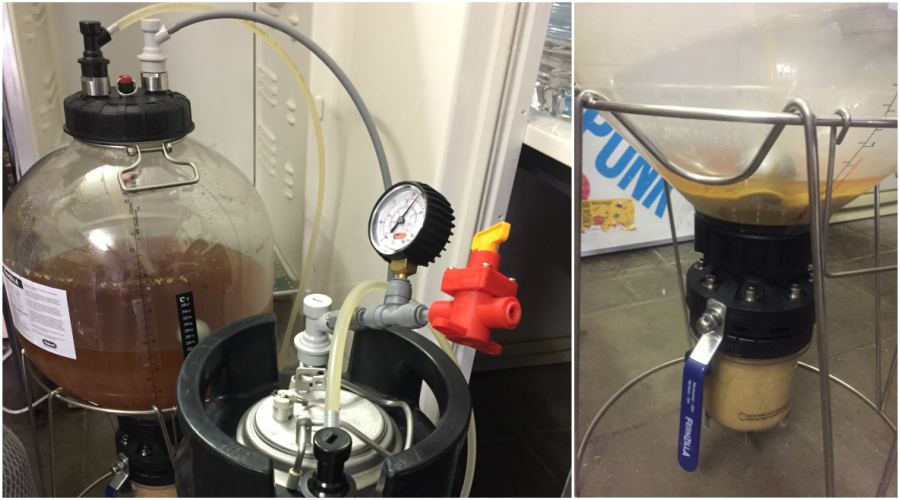
To limit foaming, I kept a lot of backpressure through regulating the spunding valve. In total, to transfer 5 gallons of beer, it took about 20 minutes. I relied on the volume markings on the FermZilla to know when the keg was full but also double checked with a scale. I didn’t want to risk getting beer in the spunding valve’s gauge. I ended up just under 5 gallons in the keg
Since I only partially carbonated the beer in the FermZilla, I hooked up the keg to 30 PSI for 24 hours to finish carbonating. The next day, the beer was fully carbonated, quite clear, and drinking amazing! No green flavors or signs of stressed fermentation. The conical shape of the FermZilla and the large collection container seemed to limit protein, hop, and yeast matter from ending up in the keg.
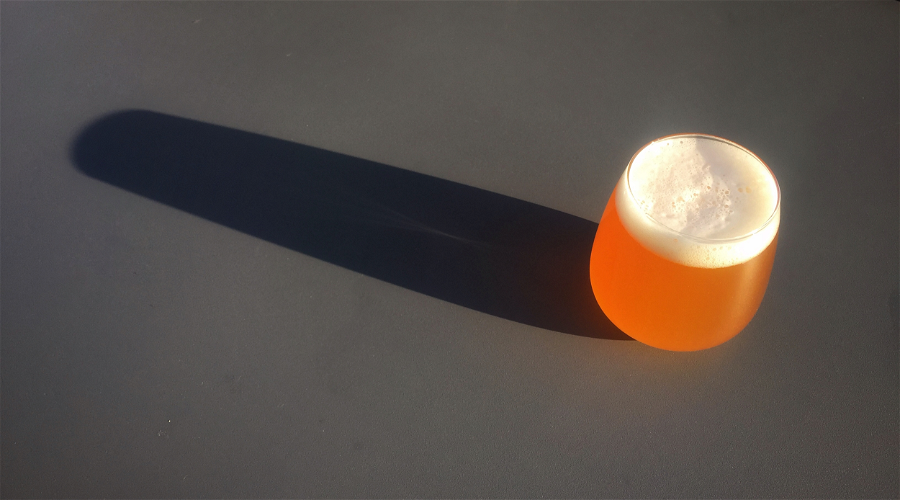
As for the beer, it’s a modern American pale ale hopped in the kettle with Vic Secret and Nelson Sauvin. The hot fermentation temperature didn’t cause any off-flavors with the Voss kveik yeast. It’s got a bit of a haze from the first keg pours, but I’m expecting this to drop relatively clear. Clean, fruity, and balanced, I’m happy to have 5 gallons of this beer during an unexpected heat wave.
Disassembly and Cleaning
With such a packed yeast cake in the collection container, I wanted to save the slurry for future use. In order to remove the collection container, you first need to depressurize the vessel. I opened up the pressure relief valve until all the CO2 escaped. Then I carefully loosened one of the black caps on the side of the container to release any leftover gas. These steps are necessary to prevent a burst of messy, yeasty slurry spraying across the room.
I closed the butterfly valve and placed a bowl under the fermenter to catch any spillage. Using the provided collection container removal tool, I was able to easily remove the container. I capped it off with the provided container lid and stored in the fridge.
In terms of cleaning, KegLand recommends using cold water to clean. This can be a bit of an annoyance since I find PBW works a lot better with warm water. But, generally, it’s easy to clean. The great thing is that you can easily fit your arm inside the opening and give the fermenter walls and nice scrub with a soft sponge. The clear plastic also helps with the visual inspection.
Pros and Cons
So far, the FermZilla has met and mostly exceeded my expectations. The pros, in my opinion, far outweigh the cons. It’s worth noting a few points, however, to help answer any remaining questions you may have about purchasing the fermenter.
The new and improved FermZilla has been tweaked to make it one of the most cost effective conical fermenters to date.
- Clear plastic fermenter is great for seeing fermentation, as well as beer volume when transferring the beer to a keg.
- Very easy to clean through the large opening at the top of the tank. The 4.75″ top port opening is big enough for most people to get their whole arm in to reach all of the internal surfaces.
- Pressure fermentation at an affordable price. Compared to similarly sized stainless steel fermenters, the FermZillla performs amazingly under pressure.
- Pressure/closed transfers are a breeze. Since the FermZilla has built-in gas and liquid ball lock posts, performing oxygen-free transfers has neer been easier. This is a game-changer for hopheads and IPA brewers who seek to limit oxygen exposure at all costs.
- The conical shape and floating dip tube helps clarify beer. Plus, the yeast container is super convenient for saving yeast slurries.
- The size and shape of the FermZilla is awkward to handle. With it’s round bulbous body, the fermenter is difficult to move. The stainless steel stand, though sturdy, allows the plastic fermenter to slip and slide when handled.
- Some users have complained that the seals on the FermZilla are leaky. I found that after some testing with water and sanitizer, finding an air-tight seal wasn’t a problem. It takes some adjusting and patience. KegLand also advises to use keg lube for a tighter seal and easier assembly.
- The yeast container can be messy. Unlike a typical stainless conical, there is no dump valve. You must remove the entire container. It’s imperative to depressurize before removing to avoid a huge mess. Even still, since yeast and trub completely fill the container, it’s impossible not to spill a bit.
- Mentioned as a pro, but also a con, is the plastic construction. Although the plastic components are well built and feel sturdy, you need to handle the unit with care, as it still could potentially crack or deform. When cleaning, always use a soft sponge to avoid scratching.
- Not for beginners. To get the most of the FermZIlla, you should already have a complete kegging set-up. A CO2 tank, kegs, couplings, and tubing are all required to pressure ferment.
- As a serving tank, I can’t really see how it’s practical unless you don’t brew that much. It takes up a lot of space. And, if the FermZilla is filled with beer, you can’t brew again until it’s empty.
Final Thoughts
KegLand claims that the FermZilla would be a game changer for homebrewers. Pressure fermentation, closed transfers, and a conical design all for a budget friendly price? I’m happy to say that the product definitely is impressive, easy to use, and – yes – quite possibly a game changer.
For homebrewers looking for a low cost and great quality conical fermenter, we highly recommend the FermZilla. Practical and versatile, this fermenter sets itself apart from the competition. If you want to improve your beer quality with minimal investment, look no further than the FermZilla.
The new and improved FermZilla has been tweaked to make it one of the most cost effective conical fermenters to date.
Frequently Asked Questions
Can I bottle condition using the FermZilla?
If you want to use the FermZilla for bottling, it’s also a great option. The collection container at the bottom helps remove sediment from the beer and will keep your bottle conditioned beers clear.
After dumping the yeast and sediment from the FermZilla, rack the beer using a siphon to your bottling bucket and bottle like usual.
How do you dry hop with a FermZilla?
Dry hopping is done in two ways with the FermZilla.
You can open the top and dump in hops, as you would any fermenter. When using this method, make sure that the tank is not pressurized and the beer is not carbonated. You could end up with a beer volcano if you add hops to carbonated beer.
The other method is to dry hop from the bottom of the fermenter, through the collection container. First, close the butterfly valve and remove the collection container. Dump the contents and give it a clean. You then add your dry hops to the container, reattach it to the FermZilla, and open the butterfly valve. The hops will mix with the beer from the bottom and, as a bonus, the beer will be exposed to much less oxygen.