Most homebrewers invest in a keg system eventually. Kegs are easy to clean, quick to fill, and fun to have around the house! Bottling beer can be tedious and takes what seems like forever to carbonate. Kegging is quick – and you can drink your beer even quicker by force carbonating.
From the stress-free “set it and forget it” to the high-pressure burst carbonation, there are a few methods to carbonate your homebrew. In this article, we’ll tell you the pros and cons of a few different ways to get the best results when force carbonating your homebrew keg.
What is force carbonation?
Yeast converts the sugar in wort to alcohol and carbon dioxide, or CO2. The CO2 dissolved in beer provides the fizzy bubbles we all know and love. Traditionally, beer was carbonated by “trapping” part of this CO2 inside a bottle or keg to provide the carbonation. These days, many breweries and homebrewers, however, force CO2 into their beer.
By diffusing CO2 into beer, brewers use what’s known as “force carbonation” to achieve the desired carbonation level in their beer. Many commercial breweries use re-capture systems to harvest and store CO2 generated by their beer. At the homebrew level, we recommend you buy your CO2 at the homebrew shop or local gas supply store.
Let’s take a look at what you need to force carbonate your homebrew and how to do it!
Force Carbonation Equipment
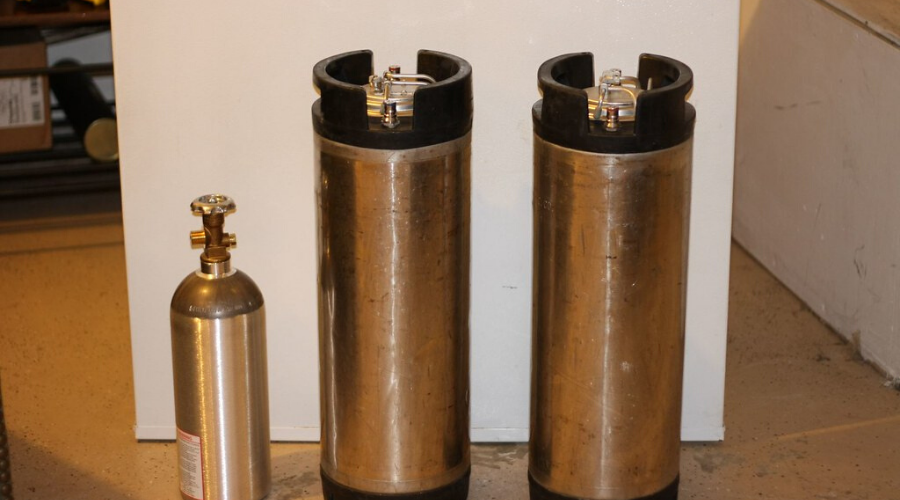
Force carbonating your keg of beer takes a few specialized pieces of equipment. For homebrewing, we recommend using a typical 5-gallon Cornelius, or corny, keg. The wide opening makes these kegs super easy to clean and fill. They’ve been used by homebrewers worldwide for years and are the gold-standard for kegging homebrew beer.
On top of the corny keg, here’s what else you’ll need to carbonate your beer:
CO2 Tank and Regulator
The most important part about force carbonating is the CO2 itself. This gas will be forced into your beer to make it nice and bubbly. Typical CO2 tanks come in 5, 10, or 20 lb volumes.
It depends on a few variables (leaks, level of carbonation, other gas usage), but expect to get about 5-7 kegs of beer per 5lb of CO2. Force carbonating uses a lot more CO2 than natural carbonation. We recommend getting the biggest tank you have space for. It’s always a pain when you run out of CO2!
Attached to the CO2 tank will be a gas regulator. This is a valve with a pressure gauge that shows you how much pressure is inside the keg.
Disconnects and Tubing
You need tubing to connect your CO2 tank to your keg. A ball lock disconnect attaches to your corny keg and gas tubing connects that to your CO2 tank. We recommend ¼” ID gas tubing and a ¼” barbed gas disconnect to ensure there are no gas leaks.
Fridge and Dispensing Equipment
Kegged beer needs to be kept cold to dispense without foaming. If you don’t have a kegerator, you’ll need a fridge big enough to hold your corny keg and a dispenser like a picnic tap.
Force Carbonation Methods
Once you have all of the required equipment, you have a few choices on how to force carbonate your beer.
You’ll need to start off with a filled and sealed corny keg. As CO2 absorbs faster in cold beer, we recommend starting with a chilled keg. If you have already cold crashed your beer, it should be cold enough.
Let’s run through the different ways to carbonate the keg and the pros and cons of each method.
Set it and forget it
The easiest and most consistent way you carbonate your beer is to “set it and forget it”. Simply attach your gas disconnect to the “in” post on the keg and slowly dial your gas regulator until it reads about 12 to 15 psi.
Depending on the temperature of your fridge, the internal pressure of the keg may vary. Consult a carbonation chart to dial in the perfect carbonation level for your beer. For most American ales, shoot for 2.5 volumes of CO2.
Leave your keg undisturbed in the fridge for 10 to 14 days. This slow carbonation process produces consistent results. Plus, most styles of beer benefit from cold conditioning. “Set it and forget it” is a stress-free and straightforward method to get perfectly carbonated beer.
| Pros | Cons |
| Easy | Takes at least a week or two |
| Consistent results | |
| Gives beer time to condition |
Shake Method
Waiting a couple of weeks to try your beer can be a struggle. We know. There must be a quicker way, right? Enter the Shake Method. This method will get you carbonated beer within a few hours but you’ll have to do a bit of physical labor.
Make sure the beer is cold. Attach the gas disconnect to the “in” post and ramp up your regulator to about 30 psi. Shake the keg of beer for 10 to 15 minutes.
Be careful shaking your keg. It is over 40 lbs, after all. And at higher pressures, there are higher risks of gas escaping from leaky connections.
We suggest rolling the keg back and forth on a blanket or a towel. Every 5 minutes, stop shaking and listen to the keg. You should hear a “hiss” sound – this is the CO2 entering the keg. After a few rounds of shaking, the sound should quickly dissipate when you stop. This tells you that the beer has absorbed most of the CO2 at that pressure and it’s ready to test.
Stand the keg in the fridge and reduce the pressure to 20 psi. Wait an hour or two for the beer to settle and pull a sample. Hopefully, you’ll have nicely carbonated beer.
If you find the beer is over-carbonated, remove the gas line, and try pulling the pressure relief valve on the keg to release some CO2. Do this every few hours until the beer is properly carbonated.
If the beer is under carbonated, you can try the process again for a few more minutes. After a day or so, by leaving the keg hooked up to 20 psi, the beer should finish carbonating.
Once you’re happy with the carbonation level, you can turn down the gas regulator to 12-15 psi for dispensing.
| Pros | Cons |
| Very quick results | Risk of over carbonation |
| Hard work! | |
| Possibility for gas leaks |
Burst Method
Another quick carbonation method is called burst carbonating. This method involves cranking up the CO2 pressure and waiting 12-24 hours for delicious, carbonated beer.
Put your keg in your fridge and connect the CO2 to the gas “in” post. Turn your regulator way up to about 40 psi. Leave your keg connected to the high pressure for a day, turn your regulator down to 20 psi, and test. You should have a nicely carbonated beer.
Burst carbonating can cause some unpredictable results and takes some experience to dial in what works best for you. Take a look at the chart below for guidelines on the pressure and time required to get the carbonation you want. If you’re in a pinch for time, it’s possible to really crank up the pressure to carbonate your beer.
| CO2 Pressure | Low to Medium Carbonation | High Carbonation |
| 30 psi | 16 hours | 48 hours |
| 35 psi | 14 hours | 34 hours |
| 40 psi | 12 hours | 30 hours |
| 45 psi | 10 hours | 26 hours |
50 psi | 8 hours | 24 hours |
We found what works best is 24 hours at 40 psi and after that, leaving the regulator at 20 psi until you’re 100% happy with the carbonation level. From there, reduce down to 10-12 psi for serving.
Normally, with this method, you will have a perfectly carbonated beer in two days. We feel like giving the keg a day or two to settle and condition helps the flavor and clarity of the beer as well.
| Pros | Cons |
| Easy | Risk to over carbonate |
| Potential for CO2 leaks due to high pressure |
Inline Carbonating
Looking for fast and consistent results? An inline carbonation system might be right for you. You can get perfect carbonation in less than an hour.
Inline carbonation works by infusing your beer with CO2 through a high efficiency diffusion stone. A pump recirculates beer through the keg for about 40-60 minutes. The beer passes by the stone which diffuses CO2 through thousands of tiny holes, quickly infusing the beer with gas. Your beer is carbonated when the set carbonation pressure is reached.
If you’re a savvy DIY type, there are a few guides available online to build your own inline carbonation system. For over the counter options, we recommend checking out the Blichmann QuickCarb – it’s an all in one kit that is easy to use with guaranteed great results.
| Pros | Cons |
| Quick and controllable results | Requires extra equipment |
| Potential for contamination throughout the pump/diffuser system |
Final Thoughts
In brewing, patience is a virtue. From brew day to fermentation, waiting for your beer to finish can be painstaking. At least for packaging, we have a great solution to get drinking your beer sooner: force carbonation.
Using the “set it and forget it” method will certainly get you perfect carbonation in your homebrew. But why wait? Try burst carbonating, shaking, or an inline system for quick carbonation to enjoy your tasty brew as soon as possible.
Frequently Asked Questions
Should I connect the gas to the “in” or “out” post on my corny keg to carbonate?
We recommend carbonating the beer through the gas “in” post only. Some guides might say to send the gas through the beer “out” post for quicker results but, in our experience, there isn’t much of a difference. In fact, there is even a risk of damaging your gas regulator if a loss of pressure causes beer to get sucked up the beer out post.
My head retention sucks… What gives?
Many homebrewers new to kegging see a difference in the head retention of their kegged beer compared to their bottle conditioned beers. Bottle conditioned beer typically has increased foam production due to the residual solids left in the bottle and more conditioning time.
To help with head retention, make sure your kegs are cleaned with an oxygen based cleaner like OxiClean, and rinsed well. Oils from certain soaps can have a negative effect on head retention. Also, try boosting the carbonation level of your kegged beer a little bit higher than your bottle conditioned beer.
If those tips don’t work, look at changing your recipe to include grain and adjuncts known to boost head retention. Try some CaraFoam, CaraPils, flaked barley, or wheat.
Can I carbonate in a keg using priming sugar?
Yes, you can naturally carbonate in a keg just as you would in a bottle. Use a priming sugar calculator and make your priming sugar solution. Add the solution to the keg, rack your beer, seal the keg, and condition at room temperature for 2 to 3 weeks. After you seal the keg, it’s a good practice to pressurize the keg by applying 15-20 psi of CO2 for a minute or two. This creates a positive seal inside the keg so the CO2 doesn’t escape.
You will still need a dispensing system (CO2 tank and beer faucet) to serve your beer from the keg.
How do I check for leaks?
If you are using the quick carbonation methods, you’ll be turning your CO2 regulator to high pressures. These higher pressures could cause loose connections to leak out CO2.
To check for leaks, turn your regulator up to 30 or 40 psi. Spray some soapy water or sanitizer over any potential leaky connection: keg lid, pressure relief valve, pressure-fitted tube connections, quick disconnects, etc. If you see foaming or bubbling, you have a leak. Remove your gas and fix your leaky component as needed.