Are you ready to sparge your homebrew in the same way as a professional brewer? With a few extra pieces of equipment, you can see your brewing efficiency shoot through the roof.
Fly sparging is the most efficient way to rinse the grain bed after the mash, releasing all the extracted sugar. It requires some equipment, but it’s the sparge option of choice for most pro brewers.
Not every brew day includes a sparge. If you’re brewing with extract, you have no grains to rinse. If you’re brewing in a bag, there’s no-rinse step either. However, the most common methods of brewing are either fly sparging (also known as continuous sparging) or batch sparging.
Both of these involve running water over the grain bed. The main difference between the two is the method of adding water. We’ll take you through the benefits of fly sparging and even give you foolproof advice for a stuck sparge.
What is Fly Sparging?
Sparging is the process of adding water to a mash/lauter tun and then draining it. This is unique to all-grain brewing; you won’t need to sparge if you’re brewing from malt extract. When you move from extract to all-grain, you have three options available after the mash: no sparge, batch sparge, or fly sparge.
The “no sparge” method is almost always brew in a bag. You add all the malt to a mesh bag during the mash. After it’s done, you simply lift the bag and squeeze (or don’t — some brewers swear it hurts the final beer).
Batch sparging is less complicated than fly sparging but more efficient than brew in a bag. This involves mashing with a small amount of water, and then “rinsing” the sugars from the grain by adding hot water in a few large batches.
If you’d like to learn more about batch sparging, check out our how-to article on the subject.
Fly sparging is a lot like batch sparging. The main difference is that you add the water continuously over time, rather than in batches. This requires a sparge arm, a device that evenly sprinkles the sparge water over the grain bed.
Why Should I Fly Sparge?
Fly sparging is the most efficient way to get as much sugar as possible from your grain. This is why almost all professional breweries fly sparge. It’s a great way to get as much value as possible from your grain.
It’s also great as a “set it and forget it” method of brewing. With batch sparging, you have to monitor the runoff, add more water, and stir. Fly sparging doesn’t need as much attention.
Mash Efficiency
Mash efficiency is the amount of sugar you were able to convert from the grain. Fly sparging is far more efficient than batch sparging at this. Of course, your efficiency depends on your methods, your skill, and even the mill of your grain!
You can expect somewhere in the 80 to 95 percent range for fly sparging efficiency. Batch sparging is generally from 70 to 85 percent, and brew in a bag is more like 60 to 75 percent. Each upgrade makes you a bit more efficient.
Your own skill and equipment make a huge difference in whether you hit 95 or 60 percent, though. If your grain is milled too fine, for example, sparging is difficult and your efficiency will tank.
Brewhouse Efficiency
Brewhouse efficiency takes into account loss at every step in the process. This includes mash efficiency, but also the water absorbed by the grain or left in the lines.
Fly sparging requires a mash tun with a false bottom. This means that your brewhouse efficiency will fall a bit if you weren’t already using one. In general, though, your sparge option shouldn’t impact this number too heavily.
How to Calculate Sparge Water
Calculating sparge water yourself can involve a bit of estimation or experimentation. There are plenty of calculators out there that will fill in those estimates for you. Those are usually close enough for homebrewing purposes.
The calculations aren’t so difficult that you can’t do them by hand. That being said, we wouldn’t recommend it with so many easy calculators out there.
The most common way to sparge is to sparge with the same amount of water as the amount of wort made after the mash. This will not be the amount of water you added to the mash — you’ll have to subtract the amount absorbed by the grain.
Calculating by Hand
To calculate this by hand, it helps to have an experimental value of how much water your grain absorbs. Every type of grain absorbs water differently, and the amount it’s been milled can affect this as well.
If you’re not sure, you can use an estimated value. These are usually close enough. The range of accepted values is 0.1-0.2 gallons per pound of grain, usually on the lower side.
The formula itself is very simple. You should sparge with the same amount of water you mashed with, minus the amount the grain absorbed. Or, in other words, the target pre-boil volume should be the runoff of the mash doubled.
Calculating by Computer
We almost never do these calculations by hand, though. With all the calculators online, there isn’t any need to figure out an absorbency rate for yourself. The calculators also take into account more variables that you’ll probably ever calculate yourself.
For example, MoreBeer’s sparge water calculator includes options such as the thickness of your mash and the amount of wort left behind in the false bottom of the mash tun. You can change these if you’d like, but the defaults are more than enough.
BeerSmith also has an excellent sparge water calculator built into its recipe-builder. It’ll cost you, but if you already have access to the software, it can calculate this for you when you input your recipe.
How to Fly Sparge
You’ll need some equipment to fly sparge effectively. Once you have your setup finalized, though, it’s easy to set it up and forget it until the sparge is over.
Fly sparge equipment
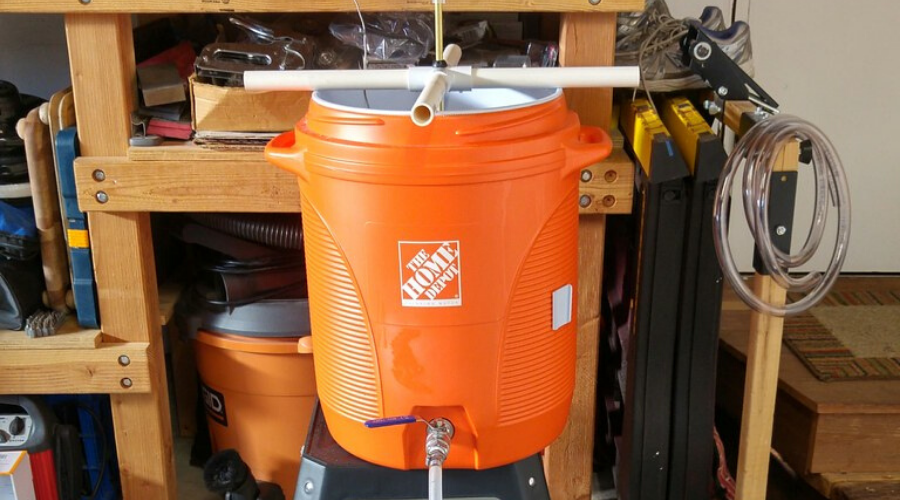
There are two essential pieces of equipment for fly sparging: the mash tun with a ball valve and false bottom, and the sparge arm. This is why fly sparging is more expensive than other forms of sparging.
The mash tun can be a cooler or a pot, but it has to have a false bottom and a ball valve. Sparging involves running water through the grain bed. With nowhere for the water to come out, sparging is impossible.
If you don’t have one or need a new one, check out our best mash tun list. We’ll help you sort through what’s worth the money and what’s not.
The sparge arm is unique to fly sparging. This is a tool that sprinkles water across the entire grain bed at once. This prevents the water from “channeling”, or digging grooves in the grain bed to run through and not rinsing all the grain.
You’ll have to power the sparge arm either by gravity or by a pump. If it’s powered by gravity, the sparge water kettle will have to be on a platform so it’s above the mash tun. The mash tun will likely be on a platform as well, so it can siphon into the boil kettle.
This setup is very common among homebrewers. We know it as the three-tier, or three-vessel, setup. You can buy stands designed for your kettles or build your own.
The other option is to use a pump. These will let you keep the mash tun and the sparge water on the same level. You’ll need a source of electricity nearby to make them work, though. This will be connected to the sparge arm.
Fly Sparge Process
You should expect the sparging process to take about an hour, but it can vary from 30 minutes up to a few hours. The slow and steady process is what causes the great efficiency rate for this method.
The process itself is not particularly complicated once your equipment is set up. The first step is the mash out. This means raising the temperature of your mash to 170°F, stopping the enzymatic action in the grains.
The mash out step isn’t entirely necessary if you’re using less grain and have a thinner wort. It will never hurt though, so we recommend it regardless. Afterward, the fly sparging begins.
- Ensure that your wort and grain are in a mash tun with a false bottom and ball valve. Attach a length of tubing to the ball valve.
- Heat your sparge water to roughly 170°F. Keep it at that temperature for the entire sparge process.
- Slowly open the ball valve and drain some wort into a pitcher until the pitcher is about half full. Empty this pitcher into the top of the mash tun, taking care to spread it around as much as possible. Repeat until the wort runs clear. This is called the vorlauf step and will ensure that the grain bed filters the wort properly.
- Over the course of a few minutes, gradually open the ball valve. You may be able to fully open it, but not always. If you open it fully and notice the wort slowing down, close it a bit to reduce suction on the grain bed.
- Once the water is about an inch above the grain bed, turn on the sparge arm so it begins to sprinkle water over the grain bed.
- Continue to add sparge water until you’ve used all your designated sparge water. Let the grain bed drain completely into the boil kettle.
How to Prevent a Stuck Sparge
A stuck sparge is every brewer’s nightmare. It takes time and effort to unstick, and after it all, you still have to finish the sparge! The best way to prevent a stuck sparge starts before you even begin brewing.
First of all, pay close attention to how well-ground your grains are. This is a common mistake but easily fixed once you know what to look for. Your grains should be cracked open, but not ground into a powder.
The next prevention is adding rice hulls to the mash. They add nothing to the beer but add open space for the wort to run through. If you’re sparging, there’s no downside to adding them to every batch. You should be adding about 5% of the grain bill at the most in rice hulls, but any amount helps.
Making sure your sparge water stays hot is another way to prevent a stuck mash before it begins. Tepid or cold sparge water may cause the powder in the grains to lock up, making a sludge at the bottom of the mash tun.
Fixing a Stuck Sparge
Even if you do everything the right way, stuck sparges are inevitable, like family obligations on your brew day. If your sparge gets stuck, you’re not lost yet. There are a few techniques you can try to get back on track.
The first step is to stir the grain bed and start over. First, turn off your sparge arm and close your ball valve. Then stir the grain bed aggressively. Focus especially on the bottom and near the ball valve.
If that isn’t successful, you can always try the “reverse pulmonary pressure” method. It’s also known by its common name, “blowing into the tubing to clear the ball valve.” If any of the grain got stuck inside the ball valve, this is the best way to dislodge it.
For both of these tricks, it’s important to complete the vorlauf step (step 3 above) again to set the grain bed. You may also find that you need to open the ball valve less to avoid another stuck sparge.
Final Thoughts
Fly sparging takes a lot of skill and time. It’s the slowest of the three most common brewing methods and needs the most equipment. If you can wrangle it, though, your efficiency will be through the roof.
Learning to sparge in this way has a high barrier to entry, but it pays off. If you’re unsure if you’re ready to jump in completely, try batch sparging first and ease your way into the process.
With this guide, you should have everything you need to get started fly sparging. Still have questions? If you’ve tried fly sparging how did it go? Let us know in the comments below.
Frequently Asked Questions
Is fly sparging better than batch sparging?
For homebrewers, the difference between the two methods of sparging isn’t much to worry about. However, almost every professional prefers fly sparging. This is because buying 10% more grain to compensate for the efficiency drop is expensive.
Fly sparging requires more equipment and time to get a better result, but you won’t suffer if you choose to batch sparge instead. Homebrewers don’t brew at the same volume, so the efficiency hit doesn’t hurt as much.
How do I build a sparge arm?
The basic idea of a sparge arm is to spread the sparge water evenly across the grain bed. This can be done as simply as running the water through aluminium foil with holes poked in it.
Another common DIY design is a manifold. This is a series of pipes with holes drilled in them, which can be attached to your sparge water. The most common one consists of rings split into “slices” like a pie.