Brewing beer is where art meets science. Creativity mixed with process and chemistry help transform hops and barley into delicious beer. Many creative beer lovers shy away from homebrewing due to the complicated process and expensive equipment. What if we told you that you could start brewing beer, at home, with the equipment you already have?
Extract homebrewing is a simple and straight-forward method to brew great quality beer at home. Despite what some homebrewers say, extract brewing can produce amazing beer! In this article, we’ll share our expertise to help you get the most out of homebrewing with malt extract.
What Is Extract Brewing?
Extract brewing gets 100% of the fermentable sugars from pre-made concentrated wort, called malt extract. Using extract makes homebrewing a lot easier since the mashing, lautering, and sparging steps have all been taken care of by someone else.
Brewing with extract is how most homebrewers got their start. It is a great gateway to the world of brewing.
Let’s run through what you’ll need to get started homebrewing.
Equipment
Extract homebrewing doesn’t need specialized equipment. You may already have most of what you need at home. If not, pretty much all of these things can be found at the hardware store. Or better yet, your local homebrew shop will have all you need and more!
In this article, we will go over everything you need to brew 5 gallons of beer at home using malt extract.
Kettle
Most homebrewers start out brewing on their stovetop using a pot that’s about 12 quarts. A full volume boil (5 to 6 gallons) is desired but there are some pros and cons to each size. Any material works but we recommend either stainless steel or aluminum.
The bigger the volume of your boil, the more utilization you’ll get from the hops. That means you’ll get more bitterness, flavor, and aroma. On top of that, a bigger boil prevents your wort from excessive caramelization, helping to keep the color light.
If you’re a new brewer, we recommend a partial boil. Once you get the hang of the process, you can always upgrade to a full volume boil. And once you have a bigger kettle, it makes converting to all-grain brewing easier.
Partial volume boil – 12-quart pot
Pros | Cons |
Great for stovetop brewing | Darkens wort |
Quick and easy to chill | Lower hop utilization |
Full volume boil – 5 to 6-gallon pot
Pros | Cons |
Better hop utilization | Most people don’t have big enough pot at home |
Less darkening of the wort | Need wort chiller |
Can be used later on for all grain brewing |
The final volume of wort will be the same no matter how big the kettle is. You’ll be diluting the wort in the fermenter to reach 5 gallons.
Other Equipment
Aside from the kettle, there are a few other pieces of equipment that we recommend getting:
- Stirring spoon: long-handled and sturdy spoon to stir in the malt extract
- Muslin bag: used to steep specialty grains for flavor and color
- Hydrometer and test jar: used to calculate your beer’s alcohol percentage
- Kitchen scale: measuring hop additions
- Thermometer
- Immersion wort chiller: cooling down wort (for full volume boils)
- Fermenter and airlock
When the time comes to package your beer, you’ll need the following:
- Bottles or kegs
- Auto-siphon and tubing: transfers the beer out of the fermenter
- Bottling bucket (if bottling)
- CO2 tank (if kegging)
- Bottle caps and capper
Cleaning Products
Keeping your equipment clean and sanitized is critical for producing good quality beer. All of the “hot side” brewing equipment needs to be cleaned with a good cleaning product – we recommend an oxygen-based cleaner, like OxiClean.
Everything that touches the beer post-boil needs to be clean and sanitized. Sanitizers are usually an acidic solution that kills bacteria that could spoil your beer. The easiest and most effective type of sanitizer is called “no-rinse”. You simply soak your equipment in the sanitizer solution, let it sit for a few minutes, and it’s good to use. We recommend Five Star’s StarSan.
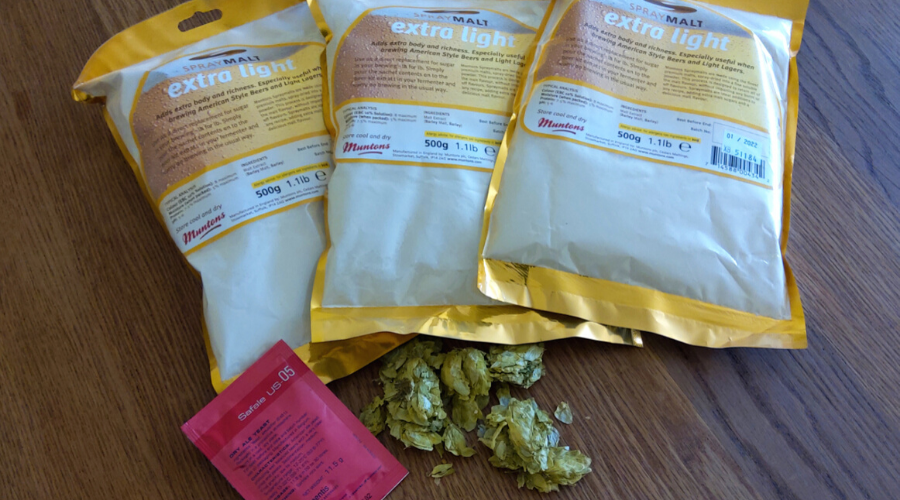
Ingredients
Extract beers are made with the exact same ingredients as the pros: malt, hops, water, and yeast!
There are a few differences in how they’re incorporated into the recipes. Let’s take a look:
Malt Extract
Beer is made from malted barley which has been mashed to produce a sweet liquid called wort. Yeast feeds on the sugars in the wort to produce alcohol and carbon dioxide.
Malt extract refers to wort that has been concentrated to remove most, if not all of the water. Malt extract manufacturers make wort using malted barley and pass it through evaporators that remove about 80% of its water. What’s left is a thick, molasses-like syrup called Liquid Malt Extract (LME). Dry Malt Extract (DME) is made by dehydrating and pulverizing LME, creating a very fine powder.
Homebrewers can purchase malt extract in both forms, either dry or liquid:
Dry Malt Extract (DME)
Pros | Cons |
Light, easy to store | Can easily clump when added to water |
Long shelf life |
Liquid Malt Extract (LME)
Pros | Cons |
Easy to mix with water | Shorter shelf life – stales and oxidizes easily |
Note: In recipes, DME and LME can be substituted at a ratio of 1:1.25. For example, if a recipe calls for 1 lb of DME, use 1.25 lb of LME. If a recipe calls for 1 lb of LME, use 0.8 lb of DME.
Varieties of Malt Extract
There are many types of malt extract available to purchase from light pilsner to dark amber and even wheat malt extract. Malt extracts made with different grains, roasted malts, and crystal malts can be purchased at any homebrew shop. Depending on the type of beer you’re making, you have several choices for your extract.
LME can come either hopped or unhopped. For the best results, use unhopped extract and add your own bittering and flavoring hops.
In most cases, we recommend using a light malt extract and adding flavor and color by steeping specialty grains.
Specialty Grains
Brewing extract doesn’t mean you’re limited to brew only certain styles. By steep grains in your wort, you can extract flavor and color to make just about any type of beer you want.
The steeping process doesn’t extract any fermentable sugar from the grain. It’s just to add complexity to your beer’s flavor and to provide color.
When using specialty grains, you need to buy them pre-crushed.
Water
The water used for brewing has a huge impact on the final flavor. Make sure your brewing water tastes good. Bad tasting water will make bad tasting beer.
When you are making an extract batch using a partial boil, you’re going to need to dilute the concentrated wort to reach 5 gallons in the fermenter. This is called top-up water.
Many extract instructions tell you to boil your top-up water to sterilize it, let it cool down, and mix with your wort in the fermenter. This ensures that your water is sterile and won’t cause an infection during fermentation. It is good advice but we think it’s unnecessary. Many homebrewers have excellent results using water directly from their tap or purchase water at the store.
You have a few options for your water source:
- Bottled water: Great tasting and no risk of infection.
- Distilled water: No risk of infection. Might leave beer “bland” tasting due to lack of minerals.
- Boiled and cooled: takes time but no risk of infection.
- Straight from the tap: quick and easy. Very low risk of infection.
If your water source is treated with chlorine, consider a carbon filter. This will remove the risk of plastic-like off-flavors caused by chloramines. For this reason, we recommend using bottled water for your brewing and top-up water.
Hops and Yeast
Hops provide beer with bitterness, aroma, and flavor. There are hundreds of types of hops available to homebrewers, usually purchased by the ounce. Like hops, yeast provides homebrewers with unlimited possibilities for experimentation.
Choosing the hops and yeast for your recipe lets you have tons of flexibility and creativity with your homebrew. When brewing from malt extract, these two variables will have the biggest impact on your finished beer.
To illustrate how a simple malt extract-based recipe looks, here is one of our favorite hoppy American amber recipes:
Sample Recipe – American Bison Amber Ale
Amber ales are great for extract brewing because steeping the dark malt provides deep, rich flavor with a beautiful amber hue. This recipe is a hopped-up version of New Belgium’s Fat Tire.
Centennial hops give this brew a fresh, piney backbone with the Amarillo rounding it out with notes of orange peel and tropical fruit.
Malt
Amount | °L | Bill % | |
6 lb | Light DME | 4.3 | 84.2% |
1 lb | Caramel 40L (crushed) | 40 | 14% |
2 oz | Chocolate Malt (crushed) | 350 | 1.8% |
7 lb 2 oz | Total |
|
|
Hops
Amount | Variety | AA | Use | Time | IBU |
0.5 oz | Amarillo | 8.6 | Boil | 30 min | 8.5 |
0.5 oz | Centennial | 9.3 | Boil | 30 min | 10 |
0.5 oz | Amarillo | 8.6 | Boil | 15 min | 5 |
0.5 oz | Centennial | 9.3 | Boil | 15 min | 6.5 |
1 oz | Amarillo | 8.6 | Aroma | 0 min | |
1 oz | Centennial | 9.3 | Aroma | 0 min |
Yeast
Sprinkle a single pack of Fermentis US-05 on top of the wort. Ferment at 68°F for about two weeks.
How To Brew Extract Beer
Now that we’ve gone over what goes into extract homebrew, follow these easy steps to get started brewing excellent quality beer.
Planning
A great plan will help your extract brew day run smoothly.
For a 5 gallon batch, you’ll need about 6 gallons of brewing water. You’ll lose a bit due to evaporation during the boil.
The day before you brew, it’s a good idea to cool down the top-up water. Keep 2-3 gallons in the fridge or a cold spot in your house, if you can. This will help when it comes time to cool your wort to yeast pitching temperature.
Print out your recipe and make sure you have at least 2 free hours to brew and clean up.
Before you start brewing, make sure your space is neat and tidy. Gather all of the ingredients, the kettle, fermenter, and other equipment.
Heat Water
Grab your brew kettle (pot) and fill it with your brewing water. Leave 2 or 3 inches of headspace at the top of the kettle. As you add the extract and hops, the volume will rise a bit. Leaving some space helps prevent a messy boil-over.
Put the kettle on high heat.
Add Speciality Grains
Put the crushed specialty grains inside the muslin bag and close with a knot. Allow to steep as the water heats up. Tie the bag around a pot handle so it doesn’t sink.
When the water reaches 170F, turn off the heat and let the grains continue to steep for 10 to 15 minutes. You will notice the water change color and start to smell great.
Remove the grain bag, allowing it to drain, and start to heat the kettle again on high.
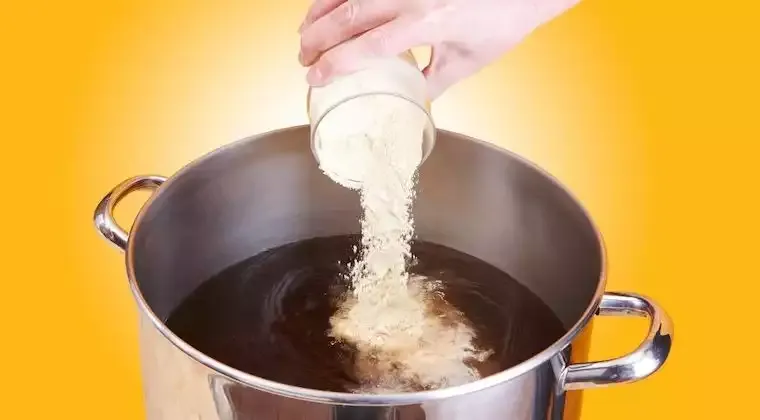
Add Extract
Once the liquid is starting to boil, remove the kettle from the heat. It’s time to add the malt extract to make your wort.
- If using DME, add it into the water one or two pounds at a time. Stir vigorously to remove any clumps and make sure it’s not sticking to the bottom. DME has a tendency to clump when exposed to steam so make sure you keep stirring to make it consistent.
- If using LME, it’s a good idea to first let the entire can/bottle sit (unopened) in a bath of hot tap water. This loosens it up so it flows easily out of the can. Open the can and slowly pour the LME into the water, stirring to make sure it mixes. LME is much heavier than water so you’ll have to stir well to keep it from sticking to the pot. Pour some hot water into the LME can to loosen up any extract stuck to the package. Add this into your kettle.
Once you’re sure that the malt extract is fully mixed, put the kettle back onto the heat and bring your wort back up to a boil.
Boiling the wort serves a few purposes. Mainly, it sterilizes the wort to kill any wild yeast or bacteria present in the malt. Boiling also extracts bitterness from the hops through the isomerization of alpha acids. On top of that, it helps drive off compounds in the wort, such as DMS, that can cause off-flavors.
Traditionally, most recipes recommend a 60 minute boil. We’ve found that shorter boils work great, especially with extract brews. Don’t be afraid to try a 30, or even 15 minute boil.
Once the wort starts boiling again, adjust the heat so it’s a slow, rolling boil. At this point, a boil-over is very possible so keep a close eye on your kettle to make sure it’s not boiling too aggressively.
Add Hops
Add the hops according to the recipe. Starting a timer with alarms helps keep you organized. Again, watch out for boil-overs when you add the hops.
If you’re doing a full boil and using an immersion wort chiller, sanitize the chiller by placing it in the boiling wort for the last 15 minutes of the boil.
Chill
After your boil is complete and all the hops have been added according to the recipe, turn off the heat.
If using an immersion chiller, chill the wort to 70F.
For partial boils, let the kettle cool down a bit. In the meantime, sanitize your fermenter with a no-rinse sanitizer.
Have an ice bath ready to cool down the wort. Fill a sink (or tub) with cold water and add ice. Place your kettle in the cold water and move it around until it’s cool – around 70 to 80F.
Top up
Now it’s time to top up the wort to reach the full volume of 5 gallons.
Put a gallon of top-up water into your sanitized fermenter. Pour your cooled wort into the fermenter. We recommend running the wort through a sanitized stainless steel sieve to remove the hop residue, but this step isn’t necessary. The beer will be fine either way! This step just helps oxygenate the wort and makes for an easier transfer at bottling time.
Top up the fermenter to reach a volume of 5 gallons. Take a hydrometer reading. This is your original gravity. Use this guide to find out how to calculate the potential alcohol percentage of your beer.
Ferment and Package
Pitch yeast and seal the fermenter. Ferment the beer in an area of constant temperature according to your yeast strain’s recommended temperature range.
After 2 weeks, take another couple of gravity readings. If the reading is steady for 3 days, your beer is finished and safe to package. Package the beer in bottles or in a keg. Use a priming sugar calculator to calculate the amount of priming sugar needed to carbonate your beer. If kegging, you can force carbonate.
Tips and Tricks
Extract homebrewing makes it easy to brew high-quality beer with minimal material investment. Here are a few tricks we’ve picked up over the years that will help you make extract beer taste just as good as all-grain:
- We prefer DME over LME as it has a longer shelf life and has a more consistent quality across brands.
- Always use light malt extract and control flavor and color with specialty grains. Avoid darker extracts – we find they can be too sweet or rely too heavily on crystal malts.
- For lighter beers, add half of the malt extract with 5 minutes left in the boil. This will limit the caramelization of the extract and give your beer a lighter color. Just be sure to take the kettle off the flame any time you add extract to avoid burning.
- Keep your recipes simple until you have a good grasp of the entire process from grain to glass.
- We like to use plastic buckets as fermenters. They are normally rated for high temperatures so you can mix hot concentrated wort with cold top-up water directly in the bucket. This saves time chilling the wort. Never add hot wort to a glass carboy – this can cause it to shatter.
Extract Brewing Video Course
If you want to learn how to brew extract beer from start to finish, check out this Craft Beer & Brewing video course:
This comprehensive introductory course teaches you everything you need to know to brew great beer at home using malt extract, hops, yeast, and water. From raw ingredients to pouring your first pint of homebrew and everything in between, there's no better introduction to the hobby.
It’s free for the first 30 days giving you access to over 60 homebrewing courses from the best brewers in the business.
Final Thoughts
Brewing great tasting beer doesn’t have to be complicated. With the amazing quality extracts available today, homebrewers have more options than ever. On top of that, combined with the hundreds of varieties of hops and yeast, extract homebrewing can be an extremely creative process.
We hope we have convinced you to try out brewing with extract – even if you’re a seasoned all grain homebrewer. If you have any questions, or want to share some tips to making better extract beer, let us know in the comments below!
Frequently Asked Questions
Why does my extract beer turn out darker than I expect?
Partial boils cause an increased Maillard reaction (caramelization of the sugars) in the wort due to the condensed boil. Performing a full volume boil should help to slow down this Maillard reaction and produce a lighter wort.
Pay attention to the age of the malt extract, especially with LME. Older LME can oxidize which also causes darkening and stale flavors.
I’m ready to jump to all grain brewing, what do I need?
If you’ve mastered extract brewing and are curious about brewing all-grain, read our guide on all-grain brewing to get you started.
Why is the bottom of my kettle burnt?
Always add malt extract to your kettle when it’s off the direct heat source. Malt extract will sink directly to the bottom of the kettle and burn if the heat is on. A scorched pan is not only difficult to clean, but it can also cause burnt flavors in your beer.