Yeast needs oxygen to convert sugars in wort into alcohol and CO2 – turning sugary, malty water into delicious and complex beer. During the wort boiling process, most oxygen is dissipated out of solution. In order to put the much-needed oxygen back into the wort, homebrewers use a technique called wort aeration.
It’s strongly suggested to add wort aeration to your process before you pitch your yeast. If you like to brew strong beers – like Imperial Stouts or Barley Wines – aerating wort will greatly help the yeast fully attenuate. This will produce clean beer and quicker fermentations without off-flavors.
What is the best wort aerator?
The best wort aerator is the OxyWand Wort Oxygenation Kit because it’s efficient, easy to sanitize, and a great bargain. Because it relies on pure oxygen to oxygenate, the OxyWand can get your wort ready to pitch your yeast in about a minute.
For a budget friendly wort aerator, you can’t go wrong with the Eagle Brewing FE380 Aeration System. Although it relies on an air pump, meaning the aeration process can be lengthy, it’s easy to use and hassle free. You also don’t need to have an oxygen tank to use it, that will save a good chunk of change in the long-term.
For more manual wort aeration methods, there are a few surefire ways to achieve good wort oxygenation. Shaking, agitating, and splashing the wort can all work to help get the most out of your yeast for strong fermentations.
The OxyWand Wort Oxygenation Kit
The advantage of using compressed oxygen to oxygenate is speed - you can oxygenate your wort in 60 seconds as opposed to 30+ minutes with the OxyWand.
Using pure oxygen to oxygenate your wort is the most efficient way to dissolve the right amount of oxygen for the best fermentations.
The OxyWand is a simple stainless steel tube with a stainless steel diffusion stone attached at the end. The assembly is connected to a compressed oxygen tank (not included) through the included tubing and tank adapter. When the tank’s valve is opened, pressurized oxygen is pushed through the wand and diffuser stone.
The porous diffuser stone has tiny 0.5 micron holes, which efficiently diffuse the oxygen through the wort. This high diffusion rate means that you can adequately oxygenate your wort in under a minute.
Since the diffuser’s holes are so small, it’s essential to boil the stone in boiling water before use. Typical brewing sanitizer can’t effectively penetrate all the tiny holes.
The OxyWand Wort Oxygenation Kit is our favorite wort aeration device. It’s easy to use, inexpensive, and super quick and efficient. No matter what style of beer you’re brewing, you’ll be sure to have sufficient oxygen in the wort for your yeast to be happy.
| Pros | Cons |
| Uses pure oxygen for fast and efficient oxygenation | Needs oxygen tank (sold separately) |
| Easy to clean and sanitize | Diffuser stone needs to be boiled before use |
Where to buy: MoreBeer, Amazon
Eagle Brewing FE380 Aeration System
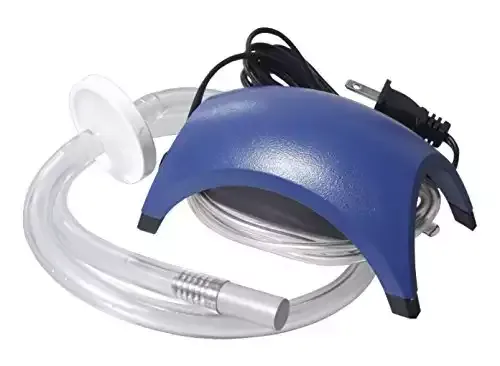
The included air-pump pushes air through an inline sanitary filter which is then dispersed into the wort through our two micron threaded stainless steel diffusion stone.
Using air to provide oxygen to wort is a very straightforward and low cost aeration method. Aeration, rather than oxygenation, is the process of adding air to the wort. Since air is made up of about 21% oxygen, it will take longer for enough oxygen to diffuse through the wort compared to using pure oxygen.
The Eagle Brewing FE380 pumps air through a HEPA grade air filter, preventing particles and contaminants from getting in the wort. The 2 micron stainless steel diffuser stone is submerged in wort while the air pump pushes the filtered air through. It will take between 30 to 90 minutes to sufficiently oxygenate the wort.
We really like this option because it’s super easy to use, easy to clean, and doesn’t need a supplemental oxygen tank to operate. If you’re patient, and give the pump enough time, your yeast should be very pleased with the amount of oxygen the FE380 can diffuse in the wort.
| Pros | Cons |
| Inexpensive | Takes 30-90 minutes for adequate oxygenation |
| No oxygen tank required | Possibility of contamination through air if not filtered properly |
Where to buy: MoreBeer, Amazon
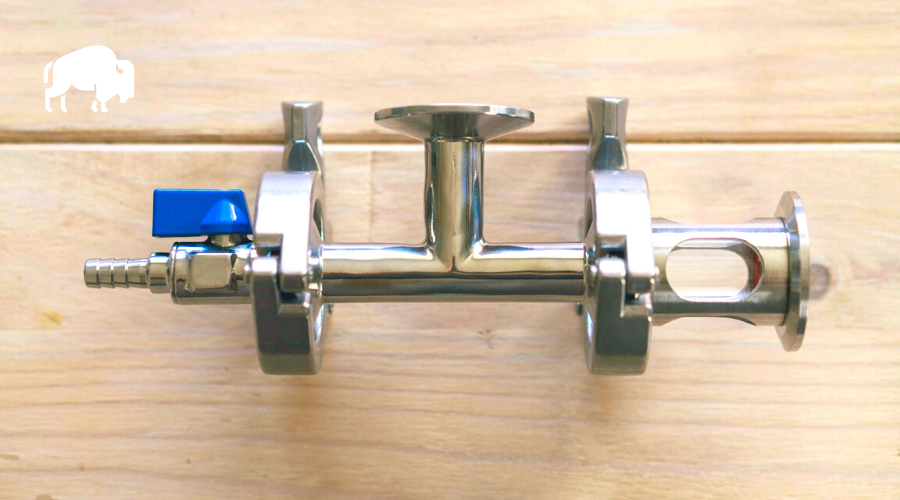
Blichmann Inline Oxygenation Kit

Get your yeast started right by providing the perfect amount of dissolved oxygen in your wort.
As with all of their homebrewing products, Blichmann Engineering takes a scientific approach. They’re experts at crafting exceptionally well-made and functional equipment. The Blichmann inline oxygenation kit pushes oxygen into cool wort when it’s on its way from the kettle to the fermenter.
This approach, favored by pro brewers, is super quick and provides excellent saturation of oxygen in wort. Cooled wort is run through a tube and connected to the Inline Oxygenation Kit. Pure oxygen, from an oxygen tank, is pushed into the wort, and the wort runs out of the device directly into your fermenter.
The use of a pump is highly recommended. Relying on gravity to feed your wort through the inline kit works, but the wort will run a lot slower. This causes a risk of over-oxygenating due to the increased contact time inside of the device.
We really like this kit for experienced brewers and gear-heads. It’s a great piece of equipment that will ensure all your fermentations start off on the right note. Plenty of oxygen will keep your yeast lively and healthy, helping you brew high quality and consistent beers, batch after batch.
| Pros | Cons |
| Most efficient method | Expensive |
| Less oxygen waste | Wort pump recommended |
| Easy to clean and sanitize | Needs oxygen tank (sold separately) |
Where to buy: MoreBeer, Amazon
Lower cost wort aeration methods
Outside of the mechanical ways to aerate wort, there are a few handy old-school manual methods to make sure your yeast gets the oxygen it needs.
Splashing
Allowing wort to splash into the fermenter incorporates some oxygen to give your yeast a better chance at a strong fermentation. There are a few different techniques for splashing:
- Dumping wort from a height into the fermenter
- Passing wort through a fine, sanitized sieve for extra diffusion
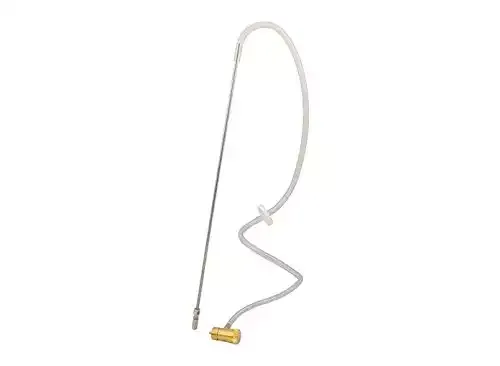
- Using an aerator tip like the Siphon Spray Wort Aerator
Splashing can work in a pinch but it’s one of the least efficient ways to aerate wort. According to most yeast manufacturers, it doesn’t provide a sufficient amount of oxygen for a healthy fermentation.
In addition to splashing, you can also add in agitating the wort.
Agitating
Agitating wort is the best manual way to get lots of oxygen dissolved into your wort. Shaking or stirring the wort will pull in air, creating a healthy environment for yeast. You can successfully agitate the wort by:
- Shaking carboy or bucket for 10 to 15 minutes
- Using a wine making degasser attached to the end of a drill
Shaking the fermenter can be dangerous, especially if using a glass carboy. It does, however, provide surprisingly good levels of aeration. It’s a tiring process but your yeast will thank you for the hard work.
Why should I aerate my wort?
Yeast needs oxygen to help promote a healthy growth phase and strong fermentation. Without enough oxygen, yeast won’t form strong cell membranes. This can lead to off-flavors, long lag times, and poor attenuation – meaning the yeast might stop fermenting before it’s finished cleaning up.
Adding oxygen to wort before pitching yeast is an important step to ensure a strong fermentation. There isn’t much oxygen in freshly boiled and cooled wort. It dissipates during the boiling process. For that reason, using a wort aeration method is essential to give the yeast a healthy environment to grow and fully ferment the beer.
For a healthy fermentation, most yeasts need a wort with about 8-10 ppm (parts per million) of oxygen. For high gravity beers, lagers, and certain yeast like kveik, even higher concentrations are recommended.
Diffusing pure oxygen, like with the OxyWand and Blichmann products, is the surest way to hit those levels. Using an air pump, a maximum of about 8ppm is all that you’ll end up with. Good enough for most styles, but lacking for others.
Using the manual aeration methods, attaining high concentrations of oxygen is difficult. Splashing will only get the wort to a few ppm of oxygen. Agitating can bring those levels up to around 8ppm with some muscle and dedication.
At the homebrew level, knowing the exact concentrations of dissolved oxygen in your wort isn’t possible. You’ll have to rely on trial and error to find the right mix of time and air/oxygen that works best for you.
Final Thoughts
Wort aeration is one piece of the puzzle to making great quality and consistent homebrew. Many brewers get away without adding oxygen before they pitch their yeast, but those who do routinely make better beer. Adding wort aeration to your process is inexpensive and easy to do.
We highly recommend The OxyWand Wort Oxygenation Kit to quickly and directly dissolve pure oxygen into your wort. It’s a straightforward and super-efficient piece of equipment that will make sure your yeast is happy and thriving. If you’re on a budget, or if you don’t want to have to worry about having oxygen bottles on hand, the Eagle Brewing FE380 is a compact and practical device.
Whether you choose to go with pure oxygen, an air pump, or old-fashioned elbow grease, aerating will boost the quality and consistency of your brew.
Please comment: If you are using pressurized fermentation, it seems you could aerate by pushing a small quantity of O2 into the headspace of the vessel. Assume that you are using a Korney keg, making 4 gallons of beer with 1 gallon of headspace. If did the math right, I find that in 4 gallons of wort at 10ppm O2 there is only ~0.3 grams O2. At NTP this is only about 0.2 liters of O2, and adding this much oxygen to via that gas inputs to the Korney keg will only increase pressure about 0.8 psi. Do you think injecting O2 into the Korney keg and letting it sit some time, & shake it, would work well? It keeps your wort in a sealed environment better than the other schemes listed here. A digital gauge reading 0.1psi increments would be needed, but that is a low cost item.
(BTW, the math included accounting for molecular weight of O2 vs H2O and that wort is around 85% H20.)