All grain brewing is a rewarding experience. Transforming raw materials into delicious beer is a skill, test of patience, and an admirable hobby. If you’ve brewed beer using malt extract, taking the next step to all grain brewing is only natural. If you’re just starting homebrewing, why not go all in with all grain?
All grain brewing can seem complicated and intimidating to extract brewers. But in fact, it’s an intuitive and easy to understand process. We’ll help guide you through mashing, lautering, sparging, and the vorlauf – making sure you understand each step along the way.
What Is All Grain Brewing?
All grain refers to brewing where all of the fermentable sugars come from malt through the mashing process. An all grain brewer takes crushed grain, adds water, and transforms this mixture into sweet wort. From there, hops are added and the wort is fermented to produce delicious beer.
Extract vs. All Grain
Most homebrewers start out with extract brews. Dried malt extract (DME) or liquid malt extract (LME) is diluted in water to create the wort. It’s true that DME and LME are made from grain, but the brewer does not have any control over the process.
All grain brewing offers a brewer complete control over the type of wort produced. By controlling the mash, all grain brewing produces any wort imaginable.
Don’t get us wrong, DME and LME are great for making all kinds of high-quality beer. An issue with malt extracts is that we don’t know how they were made, how they were stored, and how fresh they are. With all grain, you can make the exact wort you need to make any beer you want.
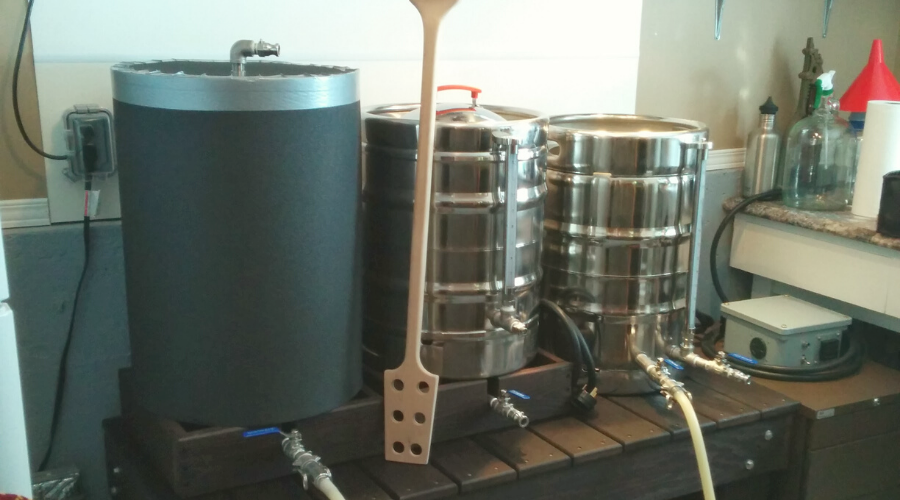
All grain homebrewing can be achieved on a number of different brewing systems. There are endless variations of all grain home breweries making amazing quality beer. This article will focus on a traditional all grain set up of a hot liquor tank, mash tun, and kettle.
Mashing
All grain brewing means that you, the brewer, create your own wort from malt. Malt refers to barley seed that is sprouted and dried and/or roasted. Other grains can be malted, such as wheat and rye, and are commonly used by brewers as well.
During the mash, crushed grains are mixed with hot water. This mixture is held at specific temperatures to extract sugars from the malt. Hot water causes the starch inside the grain to gelatinize. From there, an enzymatic process reduces complex sugars and insoluble proteins to simpler amino acid chains. This mix of sugars, proteins, and amino acid chains create a fermentable wort for brewer’s yeast.
The enzymatic activity that occurs can be controlled by a mix of temperature and time. All grain brewers have precise control by performing a specific mash type to achieve their desired outcome.
Single Infusion Mash
Nearly all homebrewers perform a single infusion. This means holding the mash at a single temperature, called a saccharification rest, to convert the sugars in the malt. This rest is between 145-160°F for 30 to 60 minutes.
Modern maltsters have optimized their malting process and produce mostly highly modified malt. This means that the enzymes have less work to do to convert the sugars in the malt. Because of this, a single infusion rest is suitable for the majority of the malts you’ll be using.
Mashing at the lower end of the saccharification rest range will produce a wort with very fermentable sugars resulting in a dryer beer. Mashing at the higher end of the range will produce a wort with more unfermentable sugars, giving the final beer more body and sweetness. For a dry Belgian Saison, consider mashing low. For a full-bodied stout, try mashing higher.
Under-modified malt can still be purchased and is used by traditional breweries. These beers benefit from a step mash, where the temperature is varied to activate specific enzymatic reactions.
Step Mash
Mashing temperatures can be controlled a few different ways. For direct fired mash tuns, heat can be applied to raise the temperature. For passive mash tuns, hot or cold water can be added to adjust the temperature.
Here’s a quick summary of typical rest temperatures and what they do:
| Mash Rest | Temperature and Time | Purpose |
| Acid Rest | 95–113 °F for 15 minutes | Lowers mash pHBreaks up sticky mash |
| Protein rest | 113–138 °F for 20 minutes | Activates proteolytic enzymes to break down proteins |
| Saccharification | 145–160 °F for 60 minutes | Starch conversion to fermentable sugars |
| Mash Out | 170 °F for 10 minutes | Stops starch conversion |
Decoction
A decoction is a step mash where part of the mash is removed, boiled, and added back to the mash to increase the rest temperature to the next step. The most traditional is a triple decoction mash where the decoction is performed three times for three different mash steps. Single and double decoctions are also quite common.
Decoction mashing increases melanoidins in the mash contributing to a fuller, maltier character in the beer. Increased tannins from boiling the grain also contribute to the mouthfeel of a beer.
Decoction mashes are traditional and not common in modern breweries. Still, decoction brewers believe it is worth the extra effort. Some of the finest beers in the world, like Pilsner Urquell, are brewed using a decoction mash.
On the homebrew scale, we think that a single infusion mash is the best way to start. Once you get the hang of it, start experimenting with other mash schedules to find what makes the best beer for you.
Enzymes
We mentioned the importance of enzymes in the mashing process. Here is some of the science behind how they work.
An enzyme is a protein-based biological catalyst that induces a reaction between substances. In grain, enzymes are created during the malting process. Diastatic and proteolytic enzymes decompose malt kernels into simple sugars during the mash. Yeast consume these simple sugars and turn them into alcohol and carbon dioxide during fermentation – making beer!
Diastatic Enzymes
Brewer’s yeast feeds on short-chain sugars to produce alcohol and CO2. The diastatic enzymes in malt help convert the long-chain sugars in the grain’s starch to short-chain sugars. The amount of leftover long-chain sugars contributes to other elements of the finished beer including mouthfeel and body.
Proteolytic Enzymes
Protein in beer provides body, head retention, and yeast nutrients. Proteolytic enzymes have two groups that break down protein in the mash:
- Proteinase: breaks down the very large protein molecules into smaller amino acid chains. This helps the head retention and reduces haze in the finished beer.
- Peptidase: breaks down the amino acid chains produced by the proteinase and converts it into yeast nutrients. This nutrient helps the yeast produce a healthy fermentation, limiting off-flavors.
Diastatic and proteolytic enzymes let the grain release the sugars, proteins, and nutrients needed for tasty beer. By controlling these enzymatic reactions, brewers can fine tune their mashes to dial in the precise beer they want.
Equipment
All grain brewing requires some special equipment that may seem complicated at first. Not to worry – we’ll break it down for you.
Brewing all grain follows the same procedure as a professional brewery – only on a much smaller scale. The common three vessel system consists of a hot liquor tank, mash tun, and boil kettle. Many homebrewers have constructed their systems using whatever they could find for as cheap as possible. Homebrewers sure have a DIY and innovative spirit!
There are many products on the market today that are specifically designed for homebrewing. We recommend checking our guides to help you make the most informed decision on the equipment you buy.
Hot Liquor Tank
Liquor is a brewing term for water. A hot liquor tank (HLT) holds hot water for use during the mash and sparge. For homebrewing, there are two main types of HLTs:
- Direct fired: a kettle the same size as the boil kettle with a heat source
- Insulated: An insulated container (like a beverage cooler) that holds hot water. These are filled with hot water from the boil kettle.
Either type of HLT will work great for homebrewing. If you go with insulated, make sure it can hold water temperature for at least an hour. That’s enough time to get through the sparge process.
Mash Tun
The mash tun is where all the enzymatic magic happens. Crushed malt is mixed with water and held at specific temperatures to convert the long-chain sugars to short-chain sugars. The sweet wort is then filtered from the grains using a false bottom or a bazooka screen.
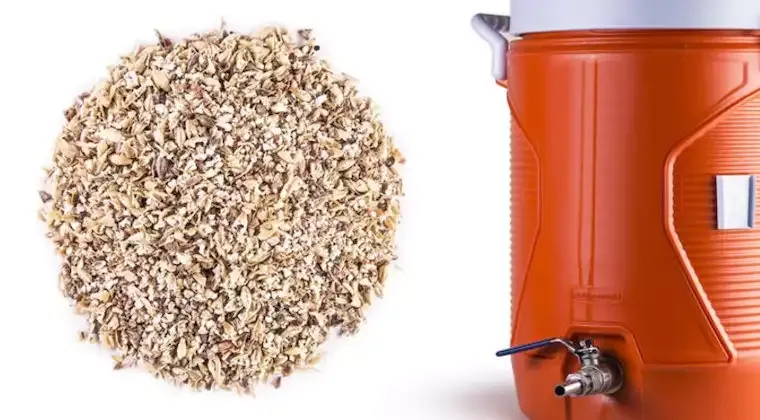
Converted coolers are by far the most common type of mash tun used by homebrewers. They’re inexpensive and hold temperature very well. A cooler can’t be directly heated so it makes step mashing difficult. Further, coolers are made of plastic which might turn some brewers away.
There are many options for mash tuns. We think the best option is stainless steel, insulated mash tun with a stainless steel false bottom. Choose a mash tun that is about the same volume as your kettle volume.
Kettle
For all grain homebrewing, the boil kettle needs to be at least a few gallons larger than your fermenter volume, to account for boil-off losses. You want a few inches of headspace between the top of the boiling wort and the brim of the kettle. Boil overs are messy and dangerous when brewing large quantities of beer.
There are many options for boil kettles but we recommend a high quality, stainless steel kettle.
Other Equipment
On top of the main equipment for homebrewing all grain beer, here are a few other items to help you with your brew day:
- Grain mill for crushing your grain
- Thermometer for water and mash temperatures
- Wort chiller to quickly chill down the wort to yeast pitching temperature
- Mash paddle
- Hydrometer for checking gravities
- Pitcher for performing vorlauf step
- Scale to weigh grain and hops
- Pumps and hoses to transfer worth between vessels
- Fermenter
Ingredients
The best thing about all grain brewing is flexibility. You can brew any beer you want without limitations. Choose between hundreds of types of malt, hops, and yeasts. On top of that, now you know that you can control the fermentability of your wort through the mash temperature.
When starting to brew all grain, we recommend keeping your recipe simple. You learn a lot about processes, ingredients, and troubleshooting on your first batch. Here is a great recipe for a single-hopped Simcoe pale ale, loosely based on Russian River’s Row 2, Hill 56.
For your first all grain batch, assume a brewhouse efficiency of 75%. The brewhouse efficiency is the measurement of potential fermentables extracted from the malt. Most all grain 3-vessel home breweries have efficiencies between 70-85%.
Simcoe Pale Ale
| Final Volume: | Original Gravity: | Final Gravity: | ABV: | IBU: | SRM: |
| 5.5 Gallons | 1.050 | 1.009 | 5.3% | 27 | 5.1 |
Malt
| Amount | Grain | °L | Bill % |
| 6 lb | Pilsner | 1.8 | 57.1% |
| 4 lb | Maris Otter | 3.75 | 38.1% |
| 0.5 lb | Crystal 15L | 15 | 4.8% |
| 10.5 lb | Total |
Hops
| Amount | Variety | AA | Use | Time | IBU |
| 0.5 oz | Simcoe | 12.7 | Boil | 30 min | 15 |
| 0.5 oz | Simcoe | 12.7 | Boil | 15 min | 11 |
| 2 oz | Simcoe | 12.7 | Whirlpool | 15 min |
Yeast
Single pack of Fermentis US-05 sprinkled on top of the wort. Ferment at 68°F for about two weeks.
Water
Use filtered water or treat water with a Campden tablet to remove chloramines.
All Grain Process
All grain brewing is dynamic and fun. At each stage, you’ll be active and immersed in the hands-on brew process. Follow these steps to ensure a stress-free and successful brew day:
Planning
A great plan will make your life a lot easier once you start brewing. Most importantly, start with clean equipment and a tidy workspace to make sure you’re ready and organized.
Calculate your water volumes and temperatures using brewing software like our favorite app BrewFather. Follow the default input guidelines for your first batch. Once you brew a few batches on your system, you’ll be able to tweak and fine-tune variables such as boil-off rate and absorption losses. These vary from system to system so it’s important to take good notes during your brew day to keep track and make adjustments in the future.
The most important output from the calculation is the following:
- Mash/Strike Volume: volume of water for an infusion mash
- Strike Temperature: Temperature of strike water. Usually about 10°F higher than the mash temperature.
- 1st Runnings: volume of first runnings of wort
- Sparge Volume: volume of water required for the sparge
When you’re ready to brew, start heating up your strike water – the water used for the mash.
Crush Your Grain
If you don’t have a malt mill, most homebrew shops offer to crush your grains for free or a small fee.
Malt should be milled so that the husk of the grain is not pulverized but still intact. Grain husks help filter the wort during the sparging process. An overly crushed malt also tends to gum up and form dough balls – which can cause a stuck sparge. Adjust your mill so that the grain is crushed, with the husks split but not pulverized. If the crushed grain looks like flour, the mill is crushing too finely.
Mashing
Once your brewing water is at strike temperature, you can start your mash.
Make sure that the false bottom/bazooka screen is installed in the mash tun and the ball valve is closed. Transfer the strike water from your HLT or brew kettle to the mash tun. Stir in the crushed malt with a mash paddle or sturdy spoon. Give the malt and water mixture a good stir for a few minutes, ensuring that all of the malt is wetted and there are no dough balls.
Check the temperature of the mash – it should be at your mash rest temperature. If it’s low, add a pint of hot water from the HLT, stir, and check again. Repeat as needed. If the mash is too hot, add cold water in the same manner.
Cover your mash tun and let it rest. Check the temperature of the mash after 30 minutes. If the mash has lost temperature, add some hot water to bring it back to the rest temperature. As long as you are within 2-3 degrees of your desired temperature, you will be fine. As you get to know your mash tun, you’ll be able to dial in your exact numbers.
Let the mash rest for one hour total – this is plenty of time for most styles of beer. During this time, make sure your HLT is full of your sparge water at the right temperature, about 170F.
Lautering
Lautering is the process of separating the malt in your mash from the sweet wort.
At this step, you’ll be filtering the wort from the grains inside the mash tun and draining into the boil kettle. We recommend conducting a batch sparge.
Sparging
Start by draining about a quart of wort into a pitcher. You’ll see pieces of malt in the wort at this point. This is normal. Gently pour this back into the mash tun. Repeat this step until the wort is clear of debris. It should take 3 or 4 cycles. What you did here is set the grain bed to allow for efficient filtration, this is called a vorlauf.
Drain the entire volume of sweet wort into your boil kettle. These are the first runnings.
Drain your sparge water from the HLT into the mash, stir, let sit for 10 minutes, and repeat the process above. If your mash tun is big enough, you can perform a single batch sparge. For smaller mash tuns, you can sparge in multiple batches. Performing multiple sparges also extracts more sugars from the malt – increasing efficiency.
Note: The alternative to a batch sparge is called a fly sparge. Instead of draining the first runnings and then adding the sparge water, a fly sparge does both simultaneously. As the mash tun runs off, water is added at the same rate to the top of the mash. This continues until the full pre-boil volume is gathered. Fly sparging is the traditional method to sparge. We think bastch sparging produces just as good results and requires less equipment. Start by batch sparging and you can always add the extra equipment to fly sparge later.
Boiling
Boiling an all grain batch requires a full volume boil. Turn your heat source on high and wait for the wort to boil. You don’t need an aggressive boil but it should be rolling and breaking the surface.
Chilling
Once your boil is complete, you need to chill down the wort to yeast pitching temperature. This is usually around 65-70F for ales and 7-13F for lagers.
When there are 15 minutes left in the boil, sterilize your chiller. For immersion chillers, place the coil directly in the boiling wort. For plate chillers, recirculate the wort through the chiller using a pump. The boiling wort sterilizes the chillers so you don’t have to use a sanitizer.
Once chilled, transfer the wort to your fermentation vessel. Don’t forget to take a hydrometer sample to know your gravity and brewhouse efficiency.
Fermenting and Packaging
Pitch your yeast and ferment your beer at the recommended temperature.
Package and carbonate in bottles or kegs and enjoy your complete all grain brew!
All-Grain Brewing Video Course
If you want to learn advanced all-grain brewing techniques, check out this Craft Beer & Brewing video course:
Join Dave Carpenter for this advanced look at getting the most from your grain. Learn the ins and outs of conditioning and crushing malt, stepped mash protocols, continuous sparge methods, and the infamous decoction mash (It's not as bad as you've heard).
It’s free for the first 30 days giving you access to over 60 homebrewing courses from the best brewers in the business.
Final Thoughts
We know jumping into all grain brewing may be intimidating at first. It takes a few batches to get the hang of it and understand your volumes, temperatures, and timings. We hope you now have a clear idea of the whole process from A to Z.
We recommend starting with an easy recipe and taking detailed notes throughout your brew day. You’ll have your system dialed in and perfected in no time.
Frequently Asked Questions
What’s the flavor difference between all grain and extract?
Extract beers are made with pre-made and concentrated wort. Through the process of concentrating, malt extract is subject to many factors, including heat, that affects the taste. Extract tends to produce a beer that finishes with a higher final gravity giving a sweet, sugary flavor. Further, extract beers tend to be darker in color. Oxidized flavors can also become apparent in old malt extract.
With all grain brewing, expect a crisper, dryer beer with a clean malt flavor.
How long does an all grain batch take to brew?
Expect a full all grain brew to take at least 4 to 6 hours. From heating up your strike water and crushing malt, to chilling and pitching yeast, you’ll be busy for the duration of the brew.
How can I increase my brewhouse efficiency?
For many brewers, hitting expected volumes and gravities is challenging. With practice, you’ll learn the ins and outs of your all grain system. This means knowing your losses (absorption rate, mash tun loss, kettle loss, etc) through the system.
Once you feel like you’ve dialed in your system but you are still unhappy with your efficiency, consider the following solutions:
- Mill your grain finer
- Calibrate your thermometer and perform more temperature checks
- Make sure your mash is well stirred and there are no dough balls or dry malt
- Calibrate and correctly use your hydrometer
Is Brewing in a Bag (BIAB) all grain?
Yes, BIAB is all grain brewing. It is a relatively newer way to homebrew beer and it goes against some of the traditional all grain brewing methods described above. We love BIAB for its simplicity and ability to make outstanding beers with minimal financial investment in equipment.
The three-vessel all grain method is a traditional, effective, and fun way to brew beer. It provides greater control and allows the brewer more flexibility to replicate classic styles.
Whatever you choose, you can make world-class all grain beer with either system!